Wednesday, March 30, 2011

Cowboy Casserole

Mr. E is all about Cowboys!!!  I have his room decorated in a 'lil cowpoke theme, he has boots, cowboy hat, holsters,cowboy pistols, and all!! 

Sometimes my sweet Mr. E can be a picky eater.  I know, hard to believe any child would automatically love anything placed before them.  Well Mr. E used to eat anything set before him, including collard greens!!  Somewhere along the way he changed.  I am not sure when it happened, it was somewhat gradual.  Now he seems to be in full blown picky eater mode. 

When I found this recipe in a Taste of Home magazine I knew he would eat it. 

Cowboy Casserole, it is just a different name for a Tater Tot Casserole, but Mr. E ate it happily!

Here is what you need:
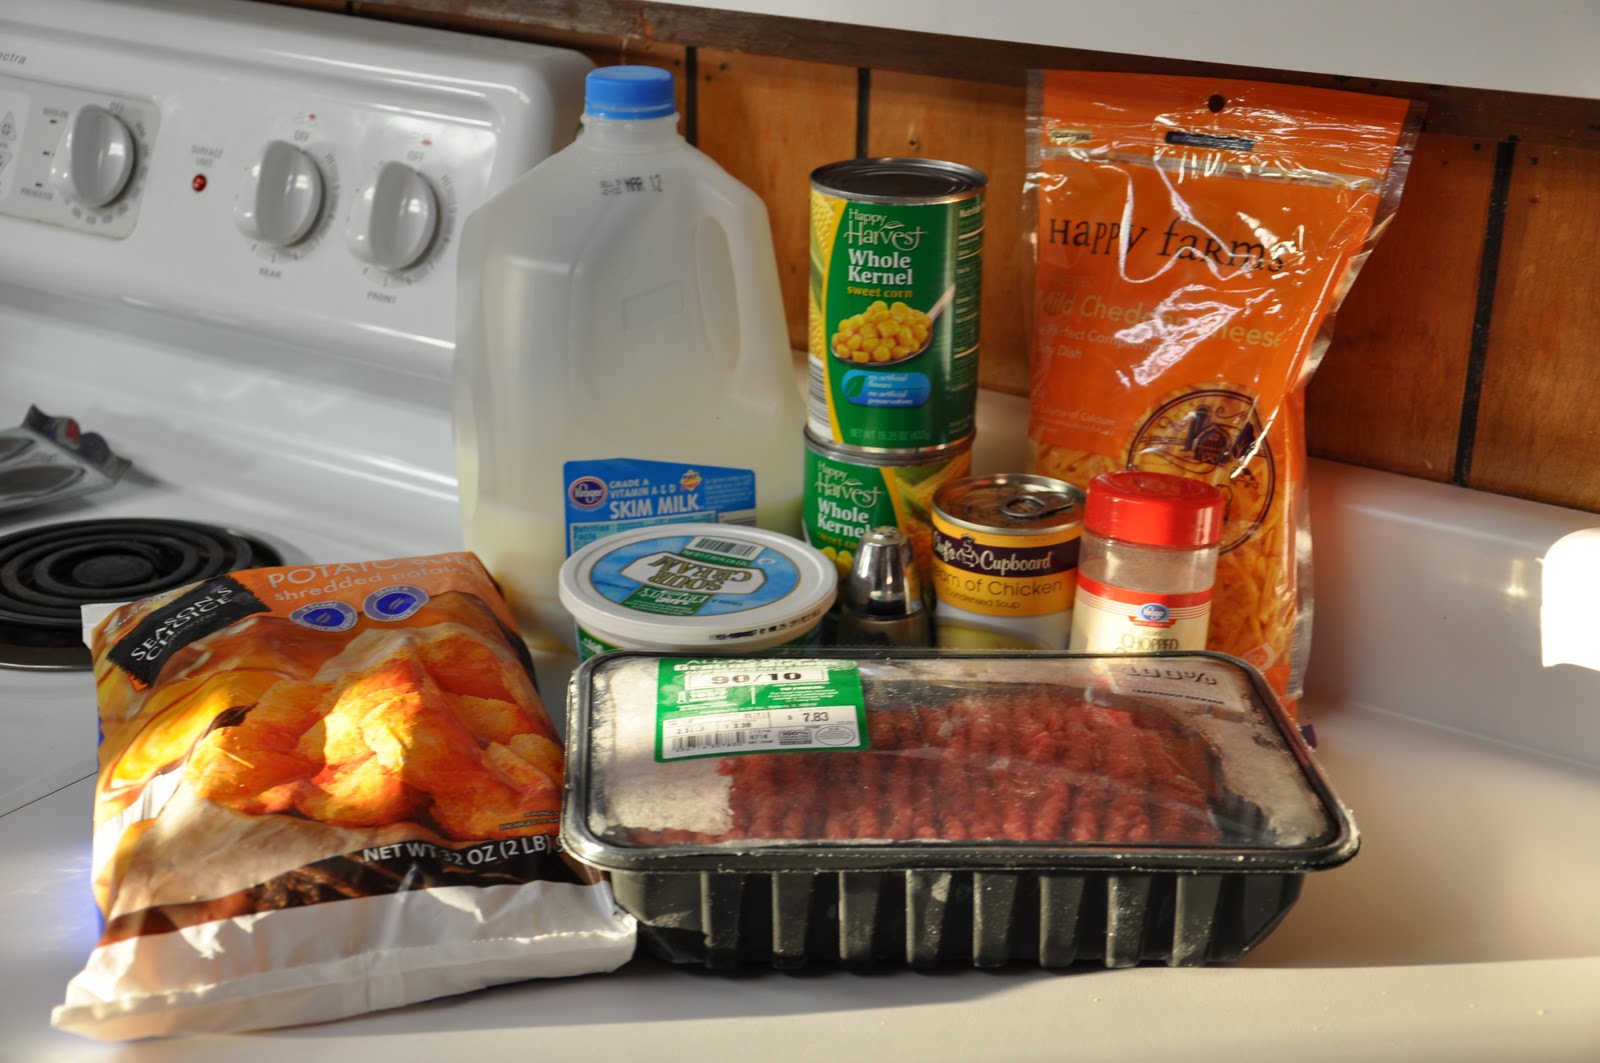
1 lb ground beef
2 cans whole kernel corn, drained
1 can cream of chicken soup
1 cup cheddar cheese, divided
2/3 cup milk
1/4 cup sour cream
1 1/2 tsp. onion powder
1/2 tsp pepper
4 cups frozen tater tots

In a large skillet cook beef over medium heat until no longer pink. 

Stir in corn, soup, 1/2 cup cheese, milk, sour cream, onion powder, and pepper.

Place 1/2 the tater tots on the bottom of a sprayed 9x 13 pan. 

Layer the beef mixture and remaining tater tots.

Sprinkle with the remaining cheese.

Bake uncovered at 375 for 20-25 minutes, until it is nice and bubbly.

Now it is time to enjoy!


Happy Baking!

Monday, March 28, 2011

Easter Wreath

I realize that we are almost to the end of March and I really need to take down my St. Patrick's Day decorations. 

I hated to take them down and have nothing new and Eastery to put up in their place.  So I decided to remedy my Easter Wreath situation.  I made a new one!!

I started with the cardboard back off one of my son's Color Wonder coloring books.  He had torn it off and I was about to throw it away when I realized I could use it!!

Take a piece of cardboard, a pen, and something square to trace.  I used one of our Church Bulletins. 

Trace the square on your cardboard.

Then cut it out.

Now it is time to wrap the square with yarn.  I had some multicolored yarn that I bought almost three years ago stashed away in the basement.  It is the perfect mix of spring colors! 

Keep wrapping until you get to the corners.  At this point wrap to the corner and then skip to the other side and wrap a couple of times. 

Now fill in the corner.  Once the corner is filled keep on going around your square until you are done.

Tie off the string and add another piece of string to hang the wreath with. 
Next I cut pieces of yarn and threaded them through the top of three small plastic eggs.  My eggs didn't have holes in the top, but I used a box cutter to make a small hole in the top of each egg.  I used an embroidery needle to thread the yarn through the hole. 

Tie a not in the end of your your to secure the egg in place.  Then put the bottom piece back on the egg.

Position your eggs at varying lengths and tie them to the frame.  I hid the excess yarn on the back of the wreath.  Then hang it up and you are all set for Easter!

Happy Crafting!!


Saturday, March 26, 2011

Nap Time, or Lack There Of

Lately Miss C has been playing through nap time about once every week and a half. 

The other day I went in to get her out of bed and this is what I found. 

She had taken her shirt off and was jumping up and down in her bed...as happy as could be!!


I really am not ready for her to give up a nap.  Especially since Mr. E still takes a hour and a half to two hour naps everyday.  I will admit she does much better without a nap than her older brother. 


Friday, March 25, 2011

Alphabet/Number Cards

Last year I saw a cool idea on making your own Alphabet flashcards at Cutie Fruity.  In anticipation of making these cool cards I made a photo album to store my cards. 


Well, unfortunately it has taken me a while to actually make the flashcards.  I haven't been too motivated because Mr. E doesn't seem too interested in learning his letters.  He has been learning his numbers in preschool, but they haven't gotten to letters yet.  I think having his own "alphabet book" might motivate him to start learning other letters...he has the letter E down. 

To make my cards I used picnik.com.  I started by finding clip art pictures and putting them on a white background in Microsoft Paint.  I adjusted the picture so that it took up about half of the screen.  I saved the paint file and then uploaded it to picnik.com.  Once in picnik.com I adjusted the size of the file to the size of a photo (2640x1980).  After resizing I added a black boarder and my letters.  I used both upper and lower case letters. 

I did the same thing and made number flashcards as well.  I did numbers 1-10.  I copied the appropriate amount of clip art pics on each card to the corresponding number. 

All in all this was a fun porject   It was a little time consuming due to finding the clip art pics and the uploading to picnik.com. But I think it will be well worth the effort!

Here are what a couple of my cards look like.  If anyone is interested in my cards send me an e-mail and I will send you the files. 


Happy Crafting!


Sunday, March 13, 2011

Refashioned Drawstring Bags

Gifts for guys (teen and up) are so hard for me, I just have no idea what to get them. 

Well my husband had some drawstring bags he had gotten from different places that he never used.  They had already been marked with logos.  I decided to cover them up and add some "cool stuff" to the fronts.


These were gifts for my husbands younger cousins.  I added Buzz Lightyear fleece to the first bag.  The second bag was for a Sr. in High School, so I wanted something a little more grown-up.  He plays Lacrosse so I figured his last name across the bag would make a little cooler.  After using heat 'n bond to adhere the appliques to the bags I stitched around the edges to make sure the fabric stayed put. 

I think this would be a fun project for a little girl's ballet bag or a sports bag with the jersey number appliqued on the front.  Endless possibilities...oh what fun!

Happy Crafting!!

Thursday, March 10, 2011

Wintry Gifts

I made a few wintry gifts for my nieces a while back.  We had an unusually cold and snowy Winter in these parts...so I hope these little gifts helped keep their sweet heads and fingers toasty warm.


I just added some fabric scrap flowers and buttons to give these simple hats some dazzle. 

It is fun making simple things custom and unique! 

Happy Crafting!

Wednesday, March 9, 2011

Shamrock Wreath

Like I said, I got the crafty bug the other day.  After I made my St. Patty's pillows I decided to make something for the front door.  Just because no one uses the front door doesn't mean it can't look cute!!

I took a wire hanger and bent it in the shape of a shamrock (three leaf clover).  I had some St. Patty's ribbon and some other various ribbons that I used to tie on the shamrock.  I finally used a long piece of ribbon to make it long enough to hang on the door. 

Now it looks nice and pretty...even if it doesn't get much use.

Happy Crafting!


Tuesday, March 8, 2011

St. Patrick's Day Pillows

The other day I was overwhelmed with the desire to craft...so I did.  I decided to take some old clothes and turn them into some St. Patrick's Day decorations.

The Hubby and I went to an Ugly Christmas Party before Christmas.  We went to Goodwill and found our Ugly attire.  Like I said "ugly" attire, so we had no plans on wearing these things again. 

The Hubby wore a green sweater vest and I wore a pair of green  1980's shorts.

They were transformed into these.


I used my Cricut to cut the LUCKY out of some black fabric scraps.  I used heat 'n bond to attach them to the pillow, and then white crochet thread for extra decoration and security.  Finally I added some fabric scrap flowers.  And I was done!!

Here is to Crafty Time...hope you are enjoying yours!!